LCEL (LangChain Expression Language)
조대협 (http://bcho.tistory.com)
앞에서 소개한 Chain은 개념적으로는 훌륭하지만, 코드양이 다소 많아지고, 병렬처리나 비동기 처리, 스트리밍 같은 고급 기능을 구현하기 어렵다. 이런 한계를 극복하기 위해서 2023년 8월에 LangChain Expression Language (이하 LCEL이 개발되었다.)
Chain의 기능을 대처하는 컴포넌트로, 병렬,비동기,스트리밍 같은 고급 워크플로우 처리에서 부터 FallBack이나 Retry 와 같은 장애 처리 기능을 지원하며, 추후에 소개할 Langchain 모니터링/평가 솔루션인 LangSmith와 쉽게 연동이 된다.
이번장에서는 앞에서 구현한 LLMChain, Sequential Chain, Advanced Sequential Chain 그리고 Router Chain을 이 LCEL로 구현하여 LCEL에 대해서 알아보고 기존 Chain과의 차이점을 이해한다.
2024년 1월 현재, 앞에서 소개한 Chain은 아직 그대로 지원이 되고 있다. LCEL은 소개가 된지 조금 되었지만 세부 컴포넌트들에 대한 기능이 아직 Chain에 비해서 약하기 때문에 계속 지원되고 있고, 또한 Chain의 경우 코딩형식이 LCEL에 비해서 function을 이용하는 전통적인 방식으로, 개발자의 취향에 따라서 이해하기 편리할 수 있다.
LLMChain
앞에서 구현한 LLMChain을 LCEL로 포팅해보면 다음과 같다.
from langchain.llms import OpenAI
from langchain.prompts import PromptTemplate
from langchain.chains import LLMChain
OPEN_AI_APIKEY="{YOUR_OPENAI_KEY}"
model = OpenAI(openai_api_key=OPEN_AI_APIKEY)
prompt = PromptTemplate.from_template("what is the famous tour place in {city}?")
chain = prompt | model
city = "Seoul"
chain.invoke({"city":city})
기존의 체인 코드를
chain = LLMChain(llm=model, prompt=prompt)
아래와 같이 변경하였다.
chain = prompt | model
prompt를 model에 전달한다는 의미로 | (파이프)를 이용하여 표현하였기 때문에 직관적이다.
Sequential Chain
조금 더 복잡한 코드를 보자. 아래 예제는 앞의 Sequential Chain의 예제를 그대로 LCEL로 포팅한 예제인데, chain1의 출력을 chain2의 입력으로 사용해서 결과를 생성하는 예제이다.
# Sequential Chain with LCEL
from operator import itemgetter
from langchain.chat_models import ChatOpenAI
from langchain.prompts import PromptTemplate
from langchain.schema import StrOutputParser
OPEN_AI_APIKEY="{YOUR_OPENAI_KEY}"
model = ChatOpenAI(openai_api_key=OPEN_AI_APIKEY)
prompt1 = PromptTemplate.from_template("what is the famous tour place in {city}? Tell me the name of the place only without additional comments.")
prompt2 = PromptTemplate.from_template("How can I get {place} by {transport}?")
chain1 = prompt1 | model
chain2 = prompt2 | model
chain = {"place":chain1,"transport":itemgetter("transport")} | chain2
output = chain.invoke({"city": "Seoul", "transport": "subway"})
print(output)
chain1과 chain2를 생성한후에, chain1,2를 연결하도록 chain을 생성하였다.
chain = {"place":chain1,"transport":itemgetter("transport")} | chain2
chain2의 입력으로{"place":chain1,"transport":itemgetter("transport")} 를 사용했는데, place 변수는 chain1의 출력값을 사용한것이고, transport 값을 itemgetter를 이용하여 애플리케이션으로 부터 받아왔다. 앞에서 부터 순차적으로 실행되기 때문에, chain2의 입력전에 “place”:chain1부분에서 chain1이 실행되게 되고, 그 결과와 함께, place와 transport가 chain2의 입력으로 전달되어 chain2가 실행되게 된다.
Advanced Sequential Chain
병렬 실행을 포함하는 조금더 복잡한 흐름을 구현해 보면 다음과 같다. 아래 코드는 앞의 Chain을 이용하여 Advanced Sequential Chain 예제를 LCEL로 포팅한 예제이다.
호출 흐름이 복잡하기 때문에, chain간의 호출 구조를 다시 도식화 해보면 다음과 같다.
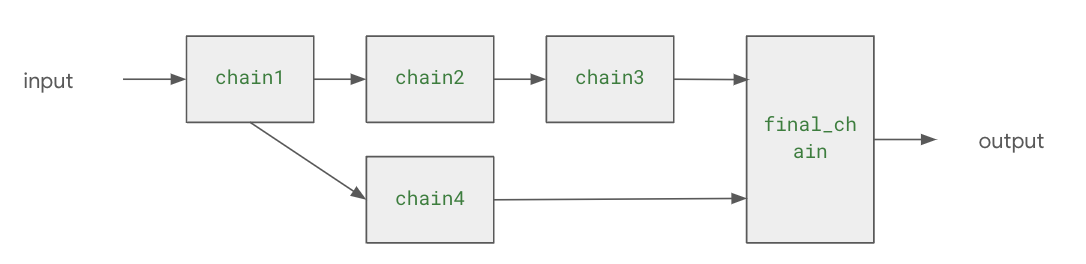
<그림 예제의 Chain간 호출 구조>
from operator import itemgetter
from langchain.llms import OpenAI
from langchain.prompts import PromptTemplate
from langchain.chains import LLMChain
from langchain.chains import SequentialChain
from langchain.schema import StrOutputParser
OPEN_AI_APIKEY="{YOUR API KEY}"
model = OpenAI(openai_api_key=OPEN_AI_APIKEY)
prompt1 = PromptTemplate.from_template("what is the famous tour place in {city}? Tell me the name of the place only without additional comments.")
prompt2 = PromptTemplate.from_template("What is the top 5 restaurant in the {place} in city {city} without additional comments?") #output : restaurants
prompt3 = PromptTemplate.from_template("What is the best one restaurant and food for family dinner among {restaurants} ?") #output : restaurant_information
prompt4 = PromptTemplate.from_template("How can I get the {place} by using {transport}?") #output : transport_information
final_prompt = PromptTemplate.from_template("""
Please summarize the tour information with reastaurant information and transportation by using the this information.
Restaurant informations : {restaurant_information}
Transport information : {transport_information}
""")
chain1 = {"city":itemgetter("city")} | prompt1 | model | StrOutputParser()
chain2 = {"place":chain1,"city":itemgetter("city")} | prompt2 | model | StrOutputParser()
chain3 = {"restaurants":chain2} | prompt3 | model |StrOutputParser()
chain4 = {"place":chain1,"transport":itemgetter("transport")} | prompt4 | model | StrOutputParser()
final_chain = { "restaurant_information":chain3 , "transport_information":chain4 } | final_prompt | model | StrOutputParser()
output = final_chain.invoke({"city": "Seoul", "transport": "subway"})
print(output)
코드의 대부분은 앞의 예제와 동일하다. 차이가 있는 부분은 아래 코드인데,
chain1 = {"city":itemgetter("city")} | prompt1 | model | StrOutputParser()
chain2 = {"place":chain1,"city":itemgetter("city")} | prompt2 | model | StrOutputParser()
chain3 = {"restaurants":chain2} | prompt3 | model |StrOutputParser()
chain4 = {"place":chain1,"transport":itemgetter("transport")} | prompt4 | model | StrOutputParser()
final_chain = { "restaurant_information":chain3 , "transport_information":chain4 } | final_prompt | model | StrOutputParser()
- chain1은 애플리케이션으로 부터 “city” 값을 입력받는다.
- chain2는 chain1의 출력값을 “place”로 입력값으로 사용하고, 애플리케이션에서 입력받은 “city”값을 입력값으로 함께 사용한다.
- chain3는 chain2의 출력값을 “restaurants”로 입력값으로 사용한다.
- chain4의 chain1의 출력값을 “place”로 입력값으로 사용하, 애플리케이션에서 “transport” 값을 입력받아서 입력으로 함께 사용한다.
- 마지막으로 final_chain은 chain3의 출력값을 “restaurant_information”이라는 키로 입력값으로 사용하고, chain4의 출력값을 “transport_information”이라는 키로 입력값으로 사용하여 LLM을 통해서 결과를 추출한다.
'빅데이타 & 머신러닝 > 생성형 AI (ChatGPT etc)' 카테고리의 다른 글
| Langchain Integrations (0) | 2024.02.01 |
|---|---|
| Langchain을 이용한 LLM 애플리케이션 구현 - #15 자연어로 SQL 쿼리하기 (0) | 2024.02.01 |
| LLM Finetune vs RLHF (0) | 2024.01.27 |
| Langchain을 이용한 LLM 애플리케이션의 구현 #14 - Chain을 이용한 워크 플로우 구현 #2 (0) | 2024.01.25 |
| Langchain을 이용한 LLM 애플리케이션 개발 #13 - Chain을 이용한 워크 플로우 구현 #1 (0) | 2024.01.24 |